


Make the move to Google+
 Google+ is Google’s refocused social networking application. It has some advantages over Facebook in that it is fully integrated with all your other Google applications. So if you have a Gmail account, Picasa photo albums, Youtube videos, Google Voice, etc., you probably have a Google+ account.
In addition to the advantage of being integrated into your existing Google world, the platform itself has some other unique features that make it a good choice for professionals as well as just the usual social networking. Google Hangouts lets you share your screen, work on documents together (a la Google Docs) and have a video discussion with up to nine others. And you can do this from your laptop, smartphone or tablet. They also have Circles which makes it much easier to categorize your “friends” and keep the information, photos, posts, etc. shared with the people you want it shared with. There are already 90 million Google+ users and all the buzz says it’s going to be a winner so it’s worth at least checking out.
When I looked at trying out Google+ my first thought was what a pain it would be to move all the photos I had previously uploaded to Facebook. Or so I thought. It’s actually not as hard as you might think. When I googled around I found that you can actually download the entire contents of your Facebook account, including all the photos which is half the battle. There are lots of steps but none of them are difficult. So, here’s how to do it:
1. From within Facebook, click on the down-arrow next to your name and Home. The top choice is Account settings. Click on it.
2. From the General Account Settings page you’ll see “Download a copy of your Facebook data” at the bottom of the list under Language. Click it.
3. On the next page you’ll see a big green button titled “Start my Archive.” Click it.
4. You’ll get a message telling you “it may take a while to gather all of your photos, etc” and you’ll need to click “Start my Archive” again and you’ll see a message telling you that you’ll be notified when your archive is ready.
5. When your Facebook data is ready to download you’ll receive an email notification with a link to the download. When you receive that email, click the link and download the file to your computer. You’ll get a single zip file containing all your Facebook data.
6. Right click on the zip file and click “Extract all…” and follow the prompts to extract the contents of the zip file. It could be a large file so it might take a few minutes for Windows to extract all the files.
7. Once extracted you’ll see a file with your facebook name on it. Double click it and you’ll see two files – one titled “html” and another titled “photos.” Inside the photos folder are all your Facebook photos. Take note of the folder location of those photos or simply copy and paste the photos folder to your “My Pictures” folder.
8. Now we need Google’s free photo management software, Picasa. Click here to download and install it. If you already have Picasa you should make sure it’s the newest version by clicking “Help – Check for Updates” from within Picasa.
9. Open Picasa, click File – Add Folder to Picasa and select the folder containing your Facebook photos.

10. In the upper right corner click on Sign in with Google Account. Sign in with your Google+ Google account here.
11. Along the left pane of Picasa you see all your folder names. Click on any one of them you want added to Google+. Once selected you turn Sync to Web to the On position and Picasa will upload your photos to your online Picasa album.
12. Once your photos have uploaded they are still private and viewable only by you. You must log into your Google+ account, select Photos from the choices across the top of the screen and then select Your albums from along the left and select which albums you want shared with which circles.

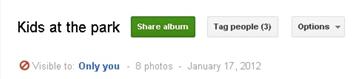
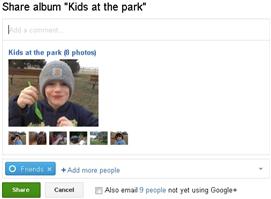
13. Click on any album you want shared with your circles and click Share Album. Select which circles you want the album shared with and you’re done. Do this for any or all albums you want shared with your Google+ circles.
Like I said, there are a lot of steps but I don’t think any of them are overly complicated and this is much easier than manually re-uploading all your photos to Google+.
 |
 |
Posted by:  George Christodoulou


